Capital Network Solutions, Inc Sacramento

Xenserver - Configuring Fiber Channel Storage Repositories

XenServer, Xensource Logo
In one of the previous blogs, I went over local storage on a single server. I'll expand that with a setup of a simple, fiber channel based storage pool. There is a very unsupported reference to part of this process in a document with the name of XEv4_shared_FC-workaround.pdf and can be found in the following forum article: http://forums.xensource.com/thread.jspa?threadID=1831 (at least as of this writing). Unfortunately, working for a Citrix partner, I am unable to share the whole document.

Some background on our particular setup:

HP DL360 G5 for use in Xenserver or VMWare infrastructure virtualization.


  • Five HP DL360, Quad-Core servers with no local disks

  • HP MSA1000 Enclosure for use in virtual storage configuration and XenServer or VMWare host operating system via boot to SAN configuration.


  • HP MSA1000 fully populated

  • HP branded, 4Gbps, Brocade fiber channel switch

  • Single QLogic fiber channel HBA in each server


I essentially went through Step 3 in the document as it is the fastest and easiest of the methods referenced.

If the storage pool is created with only one XenServer active, then this process is easy and snapping in the other servers is quickly accomplished through the GUI interface. I setup the first XenServer. During setup, I did not select any storage to utilize; I only selected storage for the XenServer operating system. The setup throws a warning but will allow to continue. After the setup, I then installed the XenServer Enterprise licensing through XenCenter, which then unlocks the ability to setup resource pools. This is why I didn't select the drives in the beginning, as it would have complicated the process later. Now I am able to create a resouce pool with my one server.

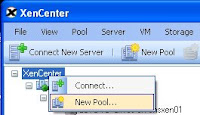
XenConsole, creating a new resource pool for XenServer.


During pool creation, XenCenter asks for the master server. Fortunately, with only one server so far, that was an easy selection. Once the pool was created, the step to create the storage was exactly as shown in part 3 of the Xen FC SAN document, part of which is posted below. I then began setting up the other XenServers and once online, simply added them to the pool and storage was immediately available. XenMotion was also functional once the servers were moved into the pool.

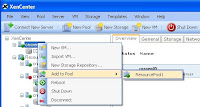
Adding a resouce to the Xenserver resource pool through XenCenter.


Step 3 requires that you use the xe CLI to create and configure a new SR from the pool
master on the LUN identified in Step 2.

The following commands are required:
1. Identify the host-uuid of the master:


HOST_UUID=`xe host-list name-label= --minimal`

2. Create the SR on the master:


xe sr-create content-type="LVM" name-label="" type=lvm shared=true host-uuid=${HOST_UUID} device-config-device=/dev/disk/by-id/

If all hosts are zoned correctly and the disk is accessible on each, the command
above will succeed and a new UUID will be generated. sr-create will
automatically associate the PBD with the UUID for every host in the pool so the
SR will be attached and ready to use. You should also check that each of the
PBDs on all hosts in the resource pool has the attribute currently-attached:true, to
indicate success of this operation.

All of the above steps also apply to a pool of 1. For setting up a Dedicated LVM over FC
SR on a host in a pool of more than 1 hosts, you must set the shared=false option in the
sr-create operation, and make sure to identify the host-uuid of the XenEnterprise v4 host
on which the LUN has been mapped."


© 2007 XenSource, Inc. All rights reserved


I wanted to also include some supported material related to this subject. Here is a snippet from the official XenServer reference document on fiber channel:


"XenServer hosts can also use Fibre Channel SANs using the Emulex or QLogic host bus adapter (HBA). Logical unit numbers (LUNs) are mapped to the XenServer Host as disk devices /dev/sdx just like physical disks would be.

The Command Line Interfaces (CLIs) for configuring and managing Emulex and QLogic Fibre Channel HBAs are included in the XenServer Host in the following locations:

Emulex: /usr/sbin/hbanyware
QLogic: /opt/QLogic_Corporation/SANsurferCLI

If you are using a Fibre Channel SAN with an HBA that supports boot from LUN, you should do all your boot from LUN setup before installing the XenServer Host. During installation, just select the remote LUNs as if they were local disk drives. Once you complete the installation and reboot, the system will boot from the remote LUN.

Fibre Channel LUNs will appear on the host as scsi devices. Each scsi device is symlinked under the directory /dev/disk/by_id using its unique scsi_id. If you are unsure which scsi_id corresponds to which device, you can query a device with the sginfo command followed by the path.

For example: sginfo /dev/disk/by_id/ {scsi_id}.

Fibre Channel disks should always be referenced by this path since it provides persistent device identification regardless of the core device name assigned by the host which may change, e.g. across host reboots."

© 2007 XenSource, Inc. All rights reserved

Citrix Presentation - Branding

Little know fact about Citrix Presentation Server is how to take advantage of some branding. I will go into that but first lets go into what we do know.

  • Citrix Presentation recommends that you should disable Windows Wallpaper

  • Windows Wallpaper uses additional resources per user if not disabled

  • Default Windows Logon Wallpaper is disabled in a RDP session

  • Windows Logon Wallpaper for an ICA session shows Citrix Branding
Now you are in luck once again because I am now going to show exactly how to do setup the branding for you customer without going against Citrix's Best Practice on Windows Wallpaper using a Step-by-Step video. In this install video there is no audio so I will outline the steps of the video here.
  1. Change the registry entry for the HKU\.DEFAULT\Control Panel\Deskto "TileWallpaper" = 1 to Tile =0 to Center
  2. Renamed the %programfiles%\citrix\system32\ica256.bmp to company logo
  3. Finished


XenServer Installation

Now that you read all the blogs regarding Citrix XenServer and have decided that this is the best option for your Virtualization of your Windows Servers it just comes down to installing.

Your in luck I am now going to show exactly how to do that using a Step-by-Step video of the install, now there is no audio so I will outline the steps of the video here.

This particular install is making use of SAN technology using a HP MSA 1000 and boot to SAN architechure using the following components:


So lets get to the steps:

  1. Enabling the QLogic HBA to see the LUN "Logical Unit Number" using Ctrl+Q
  2. Entering the Bios of the HP server to enable the Intel(R) Virtualization Technology using F9
  3. XenServer Mini Setup Wizard
  4. I selected the 58gig LUN for the XenServer Primary Disk
  5. Notice that I do not select any Partitions for the XenServer Virtual Machine storage
  6. I used the SAN Shared Storage so that we may use the XenMotion feature
  7. I installed optional Linux Tools from the Second CD
  8. After this install I used the XenCenter to connect to the XenServer and enter my XE Enterprise License Key

The Capital Network Solution's (CNS) Virualization team is composed of: Dave Murphy, Mike Knight, Troy Baker, and Eric Rossberg.

XenServer - Physical to Virtual

XenServer is an fast and easy product to setup, but one must always ask what is the reason for using the product. All the advantages of XenServer are spelled out in the previous blogs but this means nothing unless you apply some real life applications to the product.

XenServer will allow you to create new servers but what about the migration of all of those older servers that you just can't seem to get rid of, like that "Accounting application" that HR will not upgrade and requires outdated technology on that old hardware which of course is out of warranty. Hardware that has outlived it product lifecycle and will cost you the System Administrator your job if lost!

The answer is convert from a physical server to a virtual server "P2V" is the Solution!

XenServer does not provide a free Windows P2V converter, only a Linux P2V converter which is supplied on the Xenserver CD.

There of course are some 3rd party vendor supplying the P2V for Xenserver:
Leostream - http://www.leostream.com/
Platespin - http://www.platespin.com/

Platespin is the 3rd party that Xensource advises:
http://kb.xensource.com/entry.jspa?externalID=426&categoryID=18

There are some free trials from both however they have limits and PlateSpin requires that you have Xensource Enterprise License.

Leostream - http://www.leostream.com/productPVxen.html
Platespin - http://www.platespin.com/xsfreetrial/

There are always work arounds of course, mainly using a 3rd party imaging software and some manipulation.
http://forums.xensource.com/thread.jspa?threadID=631&tstart=1


Leostream is a vendor agnostic management software company that has been building virtualization related tools since 2002

Using the Leostream trial was fast and easy, filling out a simple form was all that was required.

  • The P>V process requires this Agent to be installed on the destination XenSource Host machine.
  • Before attempting a conversion, make sure the ports used by P>V are not blocked by a firewall. These ports are 8080 on the XenSource host itself, and 9400, 9401, and 9402 inside the virtual machine that will be created. To turn a XenSource Host's firewall off altogether, use the command:service iptables stopTo turn it back on, use the command:service iptables start
  • This Agent will restart automatically if the XenSource host is rebooted.
    We have an Agent available for older versions of XenServer. Please contact Leostream for more information.

Installation:

  • Using the XenServer Administrator Console, log into the destination XenSource host by entering its root password in the Text Console tab.
  • If upgrading an existing Agent, first stop the service:service leostream stop
  • Download the Leostream Xen Agent RPM file using the command:wget http://www.leostream.com/download/lxa/lxa-current.rpm
  • Install the RPM:rpm -Uhv lxa-current.rpm
    Start the agent:service leostream start

Run the Leostream Wizard on the Windows OS following the directions to obtain your license key from the website to complete the wizard.

The results of this P2V case study process was around 3hrs for an 30gig IDE hard drive, results will vary with hardware.

Adding local storage resources to XenServer

The setup and configuration of XenServer Express and XenServer Enterprise was not as straightforward as I had hoped, primarily from the standpoint of documentation. The 4.0 resouces are still lacking a bit. From the support website, for example, XenServer 4.0 only has 27 documents listed in the How-To area, compared to 82 for XenServer 3.1 and 113 for XenServer 3.2. By the way, many of the syntax differences are significant and solutions in 3.1 and 3.2 will not work in the 4.0 version, leading to a bit of extra frustration. When I wanted a quick,clear answer for how to setup or delete a storage resource (not clone, or delete my default storage), I was unable to find one. I eventually worked through the process and thought I'd share.

Under the what-if category, such as, "What if I added a bunch of storage after my initial setup?", is where I'm coming from in this article. If all storage is present at setup, then the allocation of resources is fairly straightforward. If, however, you add storage after the fact or maybe want to separate I/O into a separate storage volume, then how might that be performed through the command line? Keep in mind, if you have multiple RAID sets during setup and choose to utilize all the space during setup, XenServer will create a single lvm volume that stripes across all the discs. This means you will not easily, if at all, be able to separate your I/O loads through logical disk partitioning with the guest operating systems.

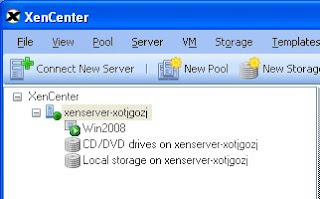
Citrix XenServer console, XenCenter, prior to adding new storage device.Here is the XenCenter console for XenServer Express. Shown is a virtual server with Windows Server 2008, the local CDROM drive and the storage resouces that was created on the initial setup of the XenServer. This is my initial starting point for resouces. I added two more drives and created a simple RAID-1 set, then wanted to add these to the XenServer.

XenServer console looking at the /dev/ directory for available SCSI volumes to add to storage resources.Looking at the server, the new storage was recognized as /dev/sdc. Having identified the storage, the next step is to create the storage resource.

sr-create command in the XenServer console for creating a new storage container to use for guest operating systems.The following is the command for creating the storage. The easiest way to enter the necessary uuid is to hit the tab key after "host-uuid=", under the assumption it's a single server setup. Here's the command:


xe sr-create content-type="localSR" host-uuid= type=lvm or ext device-config-device=/dev/sdc shared=false name-label="RAID 1 Storage Group"


If an ext type is used, the partitioning of the storage resource can take a long time. A 700Gb SATA drive took over 45 minutes. The lvm type takes seconds. Additionally, the lvm partition gives a number of advantages, which are better explained in this article.

The options that vary between installations include:
- host-uuid (your unique host uuid)
- type (based on your preference)
- device-config-device (your storage device location)
- name-label (what you want to call your storage volume within the XenCenter console)

Naturally, there are other potential options, but I wanted to cover local storage only at this point.

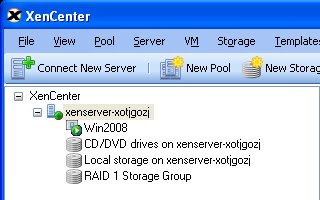
Citrix XenServer console, XenCenter, after adding the new storage device.The new storage has been created and automatically added to the XenCenter console.